Quantcast
Channel: Arduino Basics
Viewing all articles
Browse latest Browse all 112

3-axis accelerometer motion detector project

$
0
0
Description:
A 3-axis accelerometer sits at the heart of this project to provide a nifty little motion detector. Want to know who is stealing from the cookie jar? Want a simple home intrusion detector? Or to test your partner's driving skills? Then have a look at this:

(Soldering required for this project)


Video:


Parts Required:


Instructions:

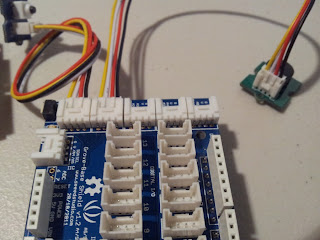
  1. Overlay the Seeed Studio Base Shield onto the Freetronics Eleven (or compatible Arduino).
  2. Use a Universal Cable to attach a Seeed Studio Grove Button to Analog Pin 0 on the Base Shield. The socket is located directly above the Freetronics Eleven Power plug, and next to the Reset button on the Base Shield. Please note that Analog Pin 1 is not used by the Grove Button.
  3. Use a universal Cable to attache a Seeed Studio Grove Buzzer to Analog Pin 1 on the Base Shield. This is the socket next to the one used in Step 2.
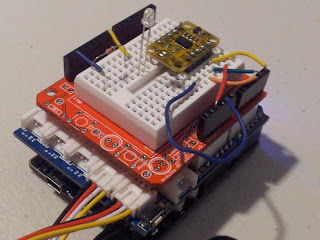
  4. Solder the female header pins to the Protoboard. Overlay the protoboard onto the Base Shield to create a third layer. I created this layer to tidy up the project and make it a little bit more portable. You could just wire up another breadboard on the side.
  5. Stick a mini-breadboard (4.5cm x 3.5cm) onto the protoboard. This allows you to use the protoboard for other projects.
  6. Solder the male headers to the 3-axis accelerometer, and then place it centrally onto the breadboard.
  7. You need 5 wires to connect:
  • GND on protoboard to GND on accelerometer
  • 5V on protoboard to     VIN on accelerometer
  • Analog Pin 3 on protoboard to X on accelerometer
  • Analog Pin 4 on protoboard to Y on accelerometer
  • Analog Pin 5 on protoboard to Z on accelerometer
  • Connect digital pin 8 to an LED and 330 ohm resistor on the breadboard,
  • Use a wire to connect the resistor mentioned above to GND on the protoboard
  • Connect the USB cable from your computer to the Freetronics Eleven, and upload the Arduino Sketch to the board. 
  • Disconnect the USB cable, and then power the Freetronics Eleven using a 9V battery and clip.
  • When you press the button, it will sound 3 warning sounds before it becomes activated.
  • If it detects a vibration or motion that exceeds the tolerance level, it will alarm. The alarm will continue until you either press the Grove button - which resets and reactivates the device or you can press the Reset button on the Base Shield to Stop monitoring for motion.


  • Sketch


    Freetronics Eleven / Arduino Sketch:

     1
    2
    3
    4
    5
    6
    7
    8
    9
    10
    11
    12
    13
    14
    15
    16
    17
    18
    19
    20
    21
    22
    23
    24
    25
    26
    27
    28
    29
    30
    31
    32
    33
    34
    35
    36
    37
    38
    39
    40
    41
    42
    43
    44
    45
    46
    47
    48
    49
    50
    51
    52
    53
    54
    55
    56
    57
    58
    59
    60
    61
    62
    63
    64
    65
    66
    67
    68
    69
    70
    71
    72
    73
    74
    75
    76
    77
    78
    79
    80
    81
    82
    83
    84
    85
    86
    87
    88
    89
    90
    91
    92
    93
    94
    95
    96
    97
    98
    99
    100
    101
    102
    103
    104
    105
    106
    107
    108
    109
    110
    111
    112
    113
    114
    115
    116
    117
    118
    119
    120
    121
    122
    123
    124
    125
    126
    127
    128
    129
    130
    131
    132
    133
    134
    135
    136
    137
    138
    139
    140
    141
    142
    143
    144
    145
    146
    147
    148
    149
    150
    151
    152
    153
    154
    155
    156
    157
    158
    159
    160
    161
    162
    163
    164
    165
    166
    167
    168
    169
    170
    171
    172
    173
    174
    175
    176
    177
    178
    179
    180
    181
    182
    183
    184
    185
    186
    187
    188
    189
    190
    191
    192
    193
    194
    195
    196
    197
    198
    199
    200
    201
    202
    203
    204
    205
    206
    207
    208
    209
    210
    211
    212
    213
    214
    215
    216
    217
    218
    219
    //Motion Detector Alarm - Written by ScottC on 2/08/2012

    //Global Variables and constants
    constint buttonPin = A0; // button Pin connected to Analog 0
    constint buzzerPin = A1; // buzzer Pin connected to Analog 1


    //Accelerometer Pins
    constint x = A3; // X pin connected to Analog 3
    constint y = A4; // Y pin connected to Analog 4
    constint z = A5; // Z pin connected to Analog 5


    //Alarm LED
    constint ledPin = 8; // LED connected to Digital 8


    int tolerance=20; // Sensitivity of the Alarm
    boolean calibrated=false; // When accelerometer is calibrated - changes to true
    boolean moveDetected=false; // When motion is detected - changes to true


    //Accelerometer limits
    int xMin; //Minimum x Value
    int xMax; //Maximum x Value
    int xVal; //Current x Value

    int yMin; //Minimum y Value
    int yMax; //Maximum y Value
    int yVal; //Current y Value

    int zMin; //Minimum z Value
    int zMax; //Maximum z Value
    int zVal; //Current z Value


    void setup(){
    //Begin Serial communication
    Serial.begin(38400);

    //Initilise LED Pin
    pinMode(ledPin, OUTPUT);

    }


    void loop(){
    // If the button is pressed, initialise and recalibrate the Accelerometer limits.
    if(analogRead(buttonPin)>500){
    calibrateAccel();
    }

    // Once the accelerometer is calibrated - check for movement
    if(calibrated){
    if(checkMotion()){
    moveDetected=true;
    }
    }

    // If motion is detected - sound the alarm !
    if(moveDetected){
    Serial.println("ALARM");
    ALARM();
    delay(1000);
    }

    }


    //This is the function used to sound the buzzer
    void buzz(int reps, int rate){
    for(int i=0; i<reps; i++){
    analogWrite(buzzerPin,900);
    delay(100);
    analogWrite(buzzerPin,0);
    delay(rate);
    }
    }


    // Function used to calibrate the Accelerometer
    void calibrateAccel(){
    // reset alarm
    moveDetected=false;

    //initialise x,y,z variables
    xVal = analogRead(x);
    xMin = xVal;
    xMax = xVal;

    yVal = analogRead(y);
    yMin = yVal;
    yMax = yVal;

    zVal = analogRead(z);
    zMin = zVal;
    zMax = zVal;

    // Calibration sequence initialisation sound - 3 seconds before calibration begins
    buzz(3,1000);

    //calibrate the Accelerometer (should take about 0.5 seconds)
    for (int i=0; i<50; i++){
    // Calibrate X Values
    xVal = analogRead(x);
    if(xVal>xMax){
    xMax=xVal;
    }elseif (xVal < xMin){
    xMin=xVal;
    }

    // Calibrate Y Values
    yVal = analogRead(y);
    if(yVal>yMax){
    yMax=yVal;
    }elseif (yVal < yMin){
    yMin=yVal;
    }

    // Calibrate Z Values
    zVal = analogRead(z);
    if(zVal>zMax){
    zMax=zVal;
    }elseif (zVal < zMin){
    zMin=zVal;
    }

    //Delay 10msec between readings
    delay(10);
    }

    //End of calibration sequence sound. ARMED.
    buzz(3,40);
    printValues(); //Only useful when connected to computer- using serial monitor.
    calibrated=true;

    }


    //Function used to detect motion. Tolerance variable adjusts the sensitivity of movement detected.
    boolean checkMotion(){
    boolean tempB=false;
    xVal = analogRead(x);
    yVal = analogRead(y);
    zVal = analogRead(z);

    if(xVal >(xMax+tolerance)||xVal < (xMin-tolerance)){
    tempB=true;
    Serial.print("X Failed = ");
    Serial.println(xVal);
    }

    if(yVal >(yMax+tolerance)||yVal < (yMin-tolerance)){
    tempB=true;
    Serial.print("Y Failed = ");
    Serial.println(yVal);
    }

    if(zVal >(zMax+tolerance)||zVal < (zMin-tolerance)){
    tempB=true;
    Serial.print("Z Failed = ");
    Serial.println(zVal);
    }

    return tempB;
    }


    // Prints the Sensor limits identified during Accelerometer calibration.
    // Prints to the Serial monitor.
    void printValues(){
    Serial.print("xMin=");
    Serial.print(xMin);
    Serial.print(", xMax=");
    Serial.print(xMax);
    Serial.println();

    Serial.print("yMin=");
    Serial.print(yMin);
    Serial.print(", yMax=");
    Serial.print(yMax);
    Serial.println();

    Serial.print("zMin=");
    Serial.print(zMin);
    Serial.print(", zMax=");
    Serial.print(zMax);
    Serial.println();

    Serial.println("------------------------");
    }


    //Function used to make the alarm sound, and blink the LED.
    void ALARM(){

    //don't check for movement until recalibrated again
    calibrated=false;

    // sound the alarm and blink LED
    digitalWrite(ledPin, HIGH);
    buzz(4,20);
    digitalWrite(ledPin, LOW);
    }

    Viewing all articles
    Browse latest Browse all 112

    Trending Articles